
How-To implement Azure Functions in Visual Studio Code
This is a C#-Dummies (as I am) tutorial to implementing Azure Functions in Visual Studio Code. In the last few days, as part of a demo & presentation, I have started to implement centrally available, .NET/C# based functions, such as barcode reading or PDF recognition, in Azure Functions. Our consultants should get an opportunity to use a central “Comsol Library / Microservices” to save time and effort instead of implementing those wide-spread functions again and again. And as we know, especially in cloud projects, you couldn’t just copy your .NET components to the ServiceTier and start hacking. The idea is then to encapsulate these external API calls in an AL extension for Business Central which they could install or use as a library/dependency in their projects.
Since there has been a Visual Studio Code Extension for Azure Functions for quite some time, I have taken this opportunity to take a closer look at it. Until now, I have implemented my Azure Functions in the full-blown Visual Studio 2019… but bundling the development, both in AL and C# in a lightweight development environment is very charming.
But it wasn’t really easy and intuitive to start from scratch. I had some steps to take and some research to do… Routines you are used to in Visual Studio work a little bit less comfortable in VS Code. And since I’m not a particularly talented .NET developer, I wrote down my findings around Azure Functions in VS Code from a beginner’s perspective here. I hope it helps one or the other with the same level of knowledge.
Addendum
A lot of the tutorials “out there” describe this procedure aswell, but the functionalities are currently very fast moving and code from existing examples from only two years ago (e.g. workshops at Directions EMEA) no longer works out of the box with the latest Azure Functions versions, especially using .NET Core.
Setup your environment
Besides the installation of Visual Studio Code there’s some additional steps to take.
Please download and install the following prerequisites.
Visual Studio Code
Install them using the Extension-Manager in VS Code.
- C#
- Azure Functions
- REST Client for debugging
Operating System
A couple of other dependencies will then be installed automatically when creating the function.
Implementing the Azure Function
The central entry-point documentation is this post in the MSDN.
Create a new function
After successfully setting up our development environment it’s time to create our first Azure Function.
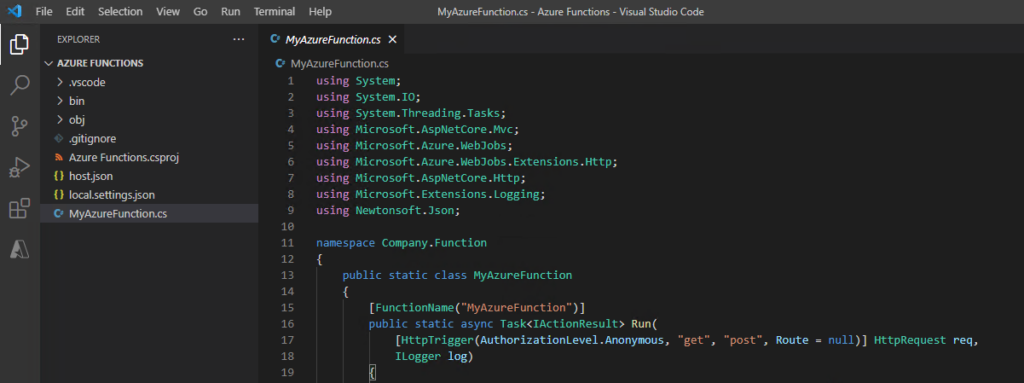
It will be an Anonymous, http-triggered function.
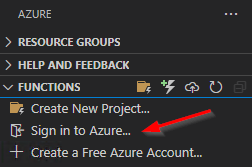
To do so, login to your Azure subscription in the Azure Functions extension:
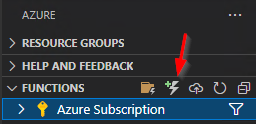
After successfully signing in, you could create the new Azure Function:
Step #1 and #2: Confirming that you want to setup a new project, choose your desired path to save.
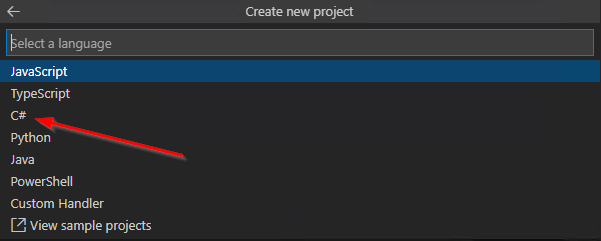
The wizard will now ask you for the language the function should be written in. Sure, we choose C#:
Step #3: In the next step of the wizard, we decide to use the future-proof .NET Core 3 Runtime:

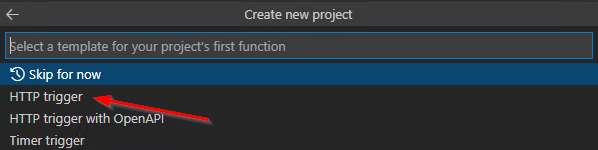
Step #4: We want to create a classic httptrigger:
Step #5: Declare your Functions name. This will later show up in our request URL:

Step #6: Add a Namespace of your choice:

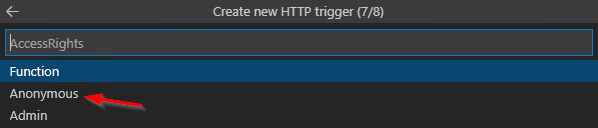
Step #7: The last step is an important one. Here we choose how to authenticate against the Azure Function.
As we would like to authenticate using an URL-Key, we choose “Anonymous”.
(This means that we will have to send a specific key encoded in the URL):
That’s it. What looks like a lot of work is actually just clicking through a guided wizard. VS Code will now start and download some more additional tools depending on your choice in Step 2.
Testing & Debugging
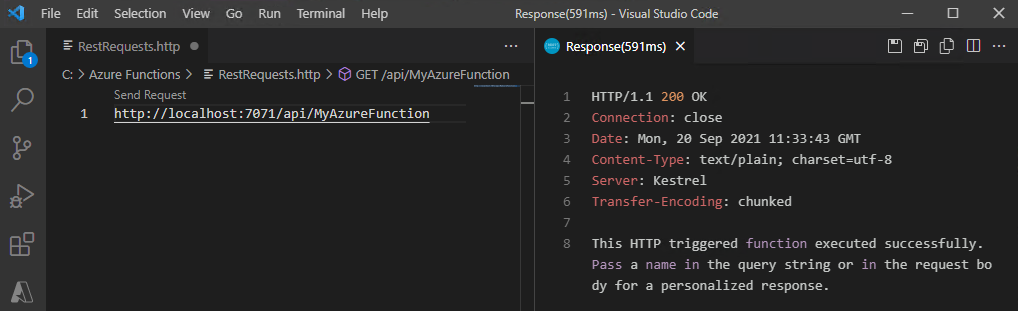
Our Azure Function is now actually ready to run… Don’t be irritated by the appearing errors in the IDE, the last packages are loaded at the first start of the function. Just hit F5 to spin it up and start the Debugger. After loading the code, you will find the local endpoint for your function in the console. We could now use this URL do create some test-requests:

A simple call using REST Client (or Postman) shows the expected response (200 OK):
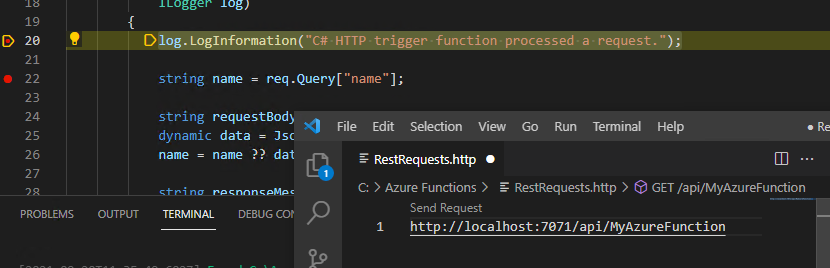
And if we put a breakpoint in VS Code, surprise, the debugger will stop:
This is the point where you can fill the function with life as you wish. No matter if external components or further web service connections. What you can imagine, you can implement here.
Receiving GET parameters
The first thing you might try is to receive some kind of additional information, parameters or even files. The easiest way to parametrize Azure Functions is the URL using GET variables.
https://www.j3ns.de/index.php?myparameter=testTo access the content of “myparameter”, you need only one line of code:
//Get parameter from query string
var query = HttpUtility.ParseQueryString(req.Url.Query).Get("myparameter");
Receiving POST payload
A more advanced and probably also more flexible way of sending information is using the payload of a POST request. Here you could literally send everything you want. Usually that’s an XML or JSON for structured data or even file streams.
JSON
If you POST a JSON payload against your Azure Function, you could access it this way:
// Get request data
string requestBody = String.Empty;
using (var streamReader = new StreamReader(req.Body))
{
    requestBody = streamReader.ReadToEnd();
}
dynamic data = JsonConvert.DeserializeObject(requestBody);

/*
//Example json payload for a barcode
{
    "content": "Test Content",
    "height": 200,
    "width": 200,
    "format": "data_matrix",
    "output": "svg"
}
*/

// Access the json content
int height = data?.height;
int width = data?.width;
string content = data?.content;
string format = data?.format;
string output = data?.output;
Stream
If you send binary data to your Azure Function, like e.g., an image, excel-file or whatever, you can directly copy the binary data from the requests body using req.Body().CopyTo() to a MemoryStream() and process it:
// Load payload to MemoryStream
var BinaryData = new MemoryStream();
req.Body.CopyTo(BinaryData);
Returning a response
Of course, we also want to get a response from the web service at the end of our request. Whether this is an OK (http 200), a bad request (http 500) or error (http 400 etc.), it can be completely defined in the code.
JSON
In this example, we create an object on-the-fly and add all the information we need. Afterwards we could write this object back to the response object using WriteAsJsonAsync():
HttpResponseData response = null;

//Create Response json object
var json = new {
                  Content = "This is a string info",
                  IntContent = 1
               };

//Add json to response
response = req.CreateResponse(HttpStatusCode.OK);
response.Headers.Add("Content-Type", "application/json; charset=utf-8");

response.WriteAsJsonAsync(json);

return response;
Stream
Returning streams like an image or other files is even easier as we just have to write the byte-array back to the response object using WriteBytes():
HttpResponseData response = null;
var ResultStream = new MemoryStream();
//... do whatever with the stream

response = req.CreateResponse(HttpStatusCode.OK);
response.Headers.Add("Content-Type", "application/octet-stream; charset=utf-8");

//Add byte array to response
response.WriteBytes(ResultStream.ToArray());

return response;
API Routing
From time to time, you may want to extend your Azure Functions. Since such extensions can also be accompanied by “breaking changes”, you have the option of using routes. So if your function should now accept a new parameter, this could of course lead to errors for the already connected customers.
So you could think about using some kind of versioning via URL to offer the new and old calls in parallel. This is where routing comes in. You could simply add e.g. a version prefix to your URI:
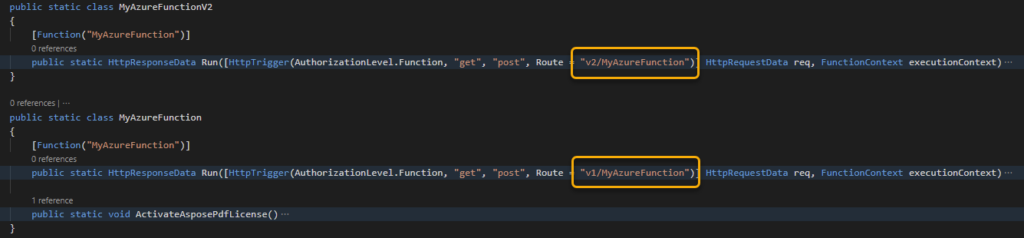
This way you could call the function over the same URI, but another version:
…/api/v1/MyAzureFunction?code=xyz1234
…/api/v2/MyAzureFunction?code=xyz1234
Deployment
Up to this point, we have solely developed, tested, and debugged locally. Now, however, we will make the functionality available externally as well. Azure Functions in Visual Studio Code could be deployed at the same spot as creating them. Navigate to the Azure Functions extension in your VS Code and push the “deploy” button.

After that, you will be asked to choose the subscription and Function to deploy to. As we would like to create a new one, we choose the corresponding option. Alternatively you could overwrite an existing one as well:

You will have to choose a global unique name:

Sure, our runtime must match our implemented Azure Function:

After choosing your desired region, your Azure Function will be uploaded and accessible in a few minutes.
You could now lookup the URL and Key in the Azure Portal at Azure Functions Menu:

The externally available URL composes as follows:
https://myazurefunctioncollection.azurewebsites.net/api/MyAzureFunction?code=xyz1234
(Where code is your Azure Functions key from the Azure Portal)
Tips & Tricks
Here you can find some hints about functionalities that are easier to set up in Visual Studio and are a bit hidden in Visual Studio Code. As I already mentioned in the beginning, I am not a proven .NET expert… so these points cost me quite some time.
Referencing NuGet packages
The place to add your dependencies is the .csproj file. Additional NuGet packages will then be discovered and installed automatically when saving the solution:
<Project Sdk="Microsoft.NET.Sdk">
    ...
  <ItemGroup>
    ...
    <PackageReference Include="ZXing.Net" Version="0.16.6" />
  </ItemGroup>
  ...
</Project>
Embedding resources
In a lot of projects, you would like to use embedded files like images or license files. Just as the NuGet packages, put your files to a subfolder and add them to your .csproj file:

<Project Sdk="Microsoft.NET.Sdk">
  ...
  <ItemGroup>
    <EmbeddedResource Include="resources/Aspose.PDF.NET.lic" />
  </ItemGroup>
  ...
</Project>
After that, you could access the resource’s stream in the code using GetManifestResourceStream():
var assembly = typeof(Company.Function.ReadPdfContent).GetTypeInfo().Assembly;
Stream resource = assembly.GetManifestResourceStream("MyAzureFunction.resources.Aspose.PDF.NET.lic");

var license = new Aspose.Pdf.License();
license.SetLicense(resource);
Use custom dll in your project
Besides NuGet packages, you can also easily use your own dlls and components in your Azure Function project.
To do this, place them in the desired folder in the project:
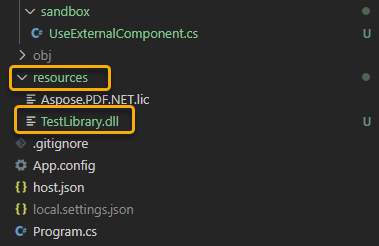
… and reference them in your *.csproj, quite similar to the NuGet packages just mentioned:
<ItemGroup>
<Reference Include="TestLibrary">
<HintPath>./resources/TestLibrary.dll</HintPath>
</Reference>
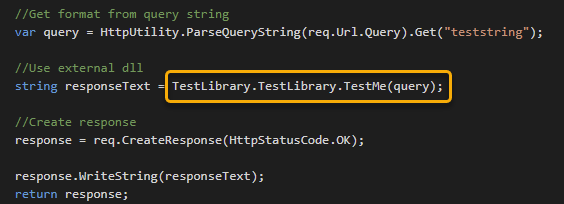
</ItemGroup>Now you are ready to use them in your functions:
The custom components will be uploaded automatically when deploying the project to Azure!
Call the function from Business Central
Now that we have built and deployed our new Azure Function, we can attempt to call it via Business Central. All we need is a few lines of code using the new HttpClient types:
codeunit 50100 "Azure Functions"
{
    var
        AzureFunctionsURILbl: Label 'https://myazurefunctioncollection.azurewebsites.net/api/v1/', Locked = true;
        AzureFunctionsKeyLbl: Label '...', Locked = true;

    trigger OnRun()
    begin
        CallAzureFunction();
    end;

    local procedure CallAzureFunction()
    var
        lJObject: JsonObject;
        lHttpClient: HttpClient;
        lHttpRequestMessage: HttpRequestMessage;
        lHttpResponseMessage: HttpResponseMessage;
        lRequestHeader: HttpHeaders;
        lRequestContent: HttpContent;
        lResponseText: Text;
        lRequestText : Text;
    begin
        //Simple GET request
        lHttpRequestMessage.Method := 'GET';

        ////Alternative: POST request with JSON payload
        //lHttpRequestMessage.Method := 'POST';
        //lRequestMessage.GetHeaders(lRequestHeader);

        ////Add JSON as payload
        ////Create JSON request object
        //lJObject.Add('parameter1', '1');
        //lJObject.Add('parameter2', '2');

        //lJObject.WriteTo(lRequestText );
        //lRequestContent.WriteFrom(lRequestText);

        //lRequestContent.GetHeaders(lRequestHeader);
        //lRequestHeader.Remove('Content-Type');
        //lRequestHeader.Add('Content-Type', 'application/json');
        //lRequestMessage.Content := lRequestContent;

        //Define request URI
        lHttpRequestMessage.SetRequestUri(CreateAzureFunctionsURI('MyAzureFunction', 'MyParameter=12345'));

        //Send webservice query
        lHttpClient.Send(lHttpRequestMessage, lHttpResponseMessage);
        if lHttpResponseMessage.IsSuccessStatusCode() then begin
            lHttpResponseMessage.Content.ReadAs(lResponseText);

            //This could be json
            Message(lResponseText);
        end;
    end;

    local procedure CreateAzureFunctionsURI(Method: Text; Parameters: Text): Text
    begin
        if Parameters = '' then
            exit(StrSubstNo('%1%2?code=%3', AzureFunctionsURILbl, Method, AzureFunctionsKeyLbl))
        else
            exit(StrSubstNo('%1%2?code=%3&%4', AzureFunctionsURILbl, Method, AzureFunctionsKeyLbl, Parameters));
    end;
}
Verdict – Azure Functions in Visual Studio Code
I think for most of us, it was a shock that we can no longer use .NET components in the cloud versions. However, with Azure Functions, Microsoft has given us a fantastic way to do the same fancy things using microservices and external API calls. And hopefully this centralized approach will increase reusability, at least for these functions.
Jens Fritzsche
... is a technical consultant and developer at Comsol Unternehmenslösungen AG in Kronberg/Taunus. Major tasks are the architecture and implementation of complex, usually cross-system applications in and around Microsoft Dynamics 365 Business Central.